How to Install 2xEDGE Staples To Use Lumber As Edging

This page details how to install a 2xEDGE Staple to secure dimensional lumber for landscape or garden edging. Installation takes just a few minutes per staple and requires only a rubber mallet.

Installation Video

The short video below shows the full installation process. Step-by-step instructions follow for reference.


Tools you'll need

As with any project involving hand tools, wearing hand and eye protection is recommended.

Required tools

  • 16 ounce rubber mallet

Optional tools

  • Saw (hand saw, circular saw, miter saw, etc.)
  • Speed square (to set or verify corner angles)
  • Tape measure
  • Garden trowel, hand rake, or similar tool for clearing the ground where lumber will be installed

Installation

For the best result, use a 16 ounce rubber mallet to install your 2xEDGE staples.

Using a regular hammer can dent or deform the crown of the staple. A rubber mallet helps seat the staple cleanly, resulting in a snug fit and a finished installation with clean lines.

If the staple shifts slightly due to soil movement, it can be reseated by tapping it back down with a rubber mallet.

2x4 lumber placed on the ground in a perpendicular position and a 2xEDGE Staple placed over the lumber in preparation to install the lumber as landscape edging.

STEP 1

Place your lumber where you want it, ensuring it’s perpendicular to the ground, and then place the 2xEDGE staple over the lumber where you want to install it.

A demonstration of the correct way to grip a 2xEDGE Staple that's been placed over 2x4 lumber with a focus on where to place the thumb.

STEP 2

Using the thumb and fingers of your free hand, grip the 2xEDGE staple and hold each leg against the lumber in order to support the legs while you tap the staple into place with your rubber mallet.
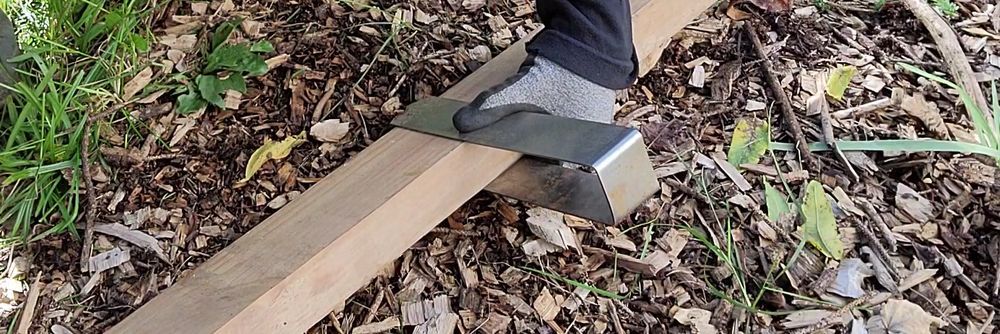
A person striking the top of a 2xEDGE Staple with a mallet to install 2x4 lumber as garden edging.

STEP 3

With a firm grip on the 2xEDGE staple and your lumber, strike the 2xEDGE squarely on its crown with your mallet until it’s sitting level on your lumber and your lumber is firmly attached to the ground.

Installation FAQs

Can I use a regular hammer instead of a rubber mallet?

A rubber mallet is strongly recommended. Using a metal hammer can dent or deform the top (crown) of the staple and affect how it seats on the lumber.

What if I hit a rock or root while installing a staple?

If a staple won’t drive fully, reposition it slightly until you find clear ground. Minor adjustments like this are normal during installation.

What if the staple loosens over time?

Seasonal soil movement can cause minor shifting. Simply tap the staple back into place to restore alignment.

Do I need to pre-drill anything?

No. 2xEDGE Staples are designed to be installed without drilling through the lumber.

Next Step

Now that you know how to install a 2xEDGE Staple, the next step is understanding where to place staples along your lumber for boards up to 10 feet long — and how placement changes for longer runs.

If you're ready to move forward with your project - view 2xEDGE Staple finishes.